
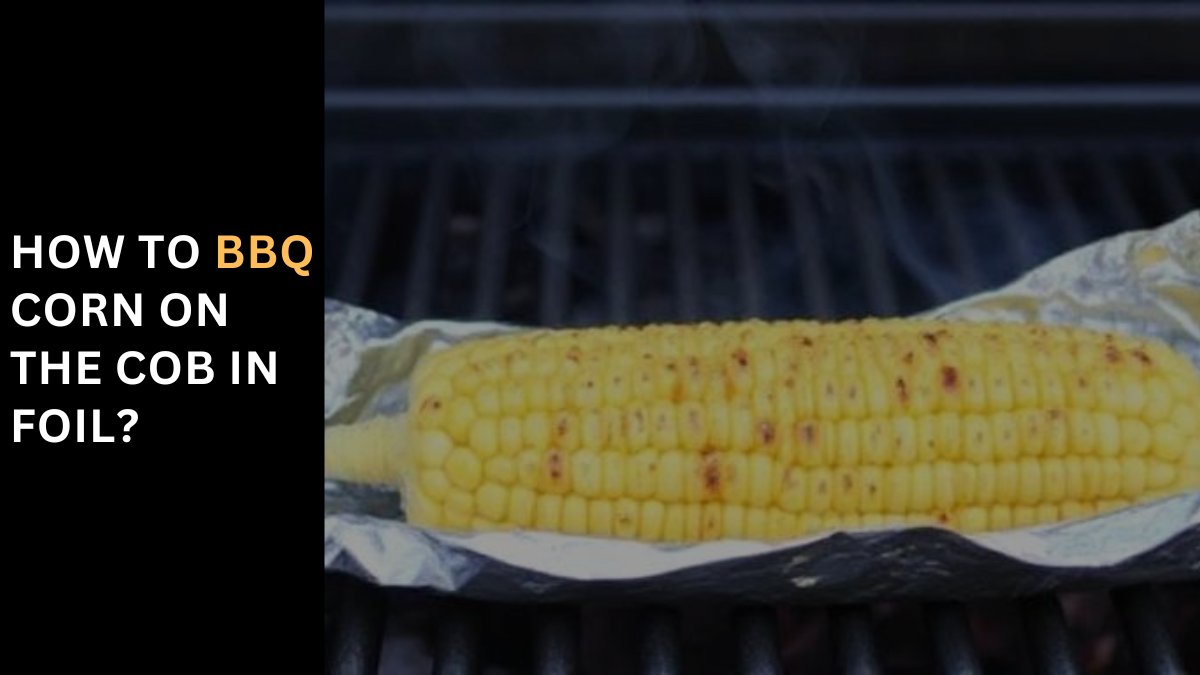
How to BBQ Corn on the Cob in Foil? Why Should You Grill Corn on the Cob in Foil? Grilling corn on the cob in foil is a game-changer, especially during those hot, summer days. Why opt for this method? First off, the prep work is wonderfully minimal. Just clean the ears of corn, and you’re good to go. No hassle of pre-soaking or the risk of the corn drying out. Wrapping the corn in foil does more than make cooking convenient; it transforms the way it tastes. This approach traps the steam and juices inside, ensuring the kernels stay moist and become incredibly flavorful. It’s a simple yet effective way to cook corn that often gets overlooked. Plus, cooking corn on the grill means you can avoid turning on the stove and heating your kitchen, a significant advantage on sweltering days. The foil-wrapped corn can be placed outside on the grill, requiring hardly any supervision. Just leave it over medium-high heat for about 15-20 minutes, and you’ll have perfectly cooked corn. This method is not just quick and easy; it’s the easiest and most efficient method to achieve that ideal balance of taste and texture in your corn. Whether you’re an experienced cook or a beginner, grilling corn in foil is a foolproof way to enjoy this summer staple. Can I Prep Foil Wrapped Corn Ahead? Cooking corn on the cob in foil is a great way to enjoy a classic treat, especially when you’re out camping. The beauty of this method is the ability to pre-wrap the ears of corn before even leaving home. Having them ready to toss on the campfire or campsite grill makes your outdoor culinary experience much more efficient. From personal experience, I recommend double-wrapping your corn with two layers of foil if you plan to cook them later. This extra step ensures the corn stays protected and juicy, ready for that perfect grill moment. How to Season Your Corn on the Cob? Sure, you can serve corn plain or with a bit of butter if you’re counting calories, but why not enjoy it juicy and right out of the foil, seasoned in a way that screams summertime? Adding a sprinkle of lemon zest and some fresh dill to your foil-grilled corn can make it mouth-wateringly delicious. Adding these simple yet flavorful ingredients elevates the humble corn on the cob to a new level, making each bite a burst of summer flavor. How to Make Lemon Dill Butter? To create a delectable Lemon Dill Butter, start by taking room-temperature cream butter and placing it in a bowl. Use a fork to stir in pepper, salt, and a generous amount of lemon juice until the mixture is smooth. This should only take a few minutes of stirring to mix well. Finally, keep adding freshly chopped dill to the butter, ensuring it’s fully incorporated. This butter is perfect to serve over hot corn. How to Grill Corn in Foil? To grill corn in foil, first Preheat your Grill to Med/High. Begin by shucking the corn, and removing all the husks. You can leave the ears whole or break them into the size you prefer. Wrap each ear in a generous sheet of aluminum foil, making sure all sides are covered. If you’re using regular, kitchen-standard foil, consider a double layer to prevent the corn from getting scorched. With the grill lid closed, cook the corn over medium/high heat, rotating them every 2-3 minutes to keep them from scorching. After about 15-20 minutes, the corn should be done; it’s typically finished at 18 minutes. Remove the corn from the grill, brush it with your homemade Lemon Dill Butter while it’s still warm, and Serve immediately. Don’t wait – enjoy it hot and flavorful! Grilled Corn in Foil Grilling corn on the cob in foil is not just easy, it’s a new way I’ve discovered to enjoy an all-time favorite. This method is perfect for those busy summer days when the smell of charcoal lingers in the air and you have a big pile of corn ready. Wrap each ear in aluminum foil and it’s a hands-off approach on the grill, letting you focus on the rest of the meal. The corn cooks evenly through the grates, getting just the right char on the outside without requiring constant babying. It’s a set-and-forget method, ideal when you need to make dinner and want to add something like potatoes for a balanced meal. Ingredients for Grilled Corn in Foil The ingredients for grilled corn in foil are simple and let the grill do most of the work. All you need is Corn on the cob, as ripe as you can get it during the season. Olive oil, Butter, Salt, and pepper are essentials for flavoring. Don’t forget Other toppings which I’ll mention in the section below. How to Make Grilled Corn in Foil: A Few Tips! When making grilled corn in foil, there are a few tips you need to know. First, get your grill to the right temperature; Preheat it to medium-high heat, typically between 375 to 450 degrees Fahrenheit. Place the seasoned corn on the grill: Rub each ear with olive oil, then cover it with salt and pepper and a few pats of butter on top. When you Wrap the corn, do it loosely but seal the edges of the wrapper tight. Don’t poke holes in the aluminum to allow air to escape. Grill for about 20 to 25 minutes, turning occasionally. Check to see if it’s bright yellow and cooked through; the timing will depend on the exact temperature of your grill. Remember this simple recipe, and you’ll be able to repeat it with ease. Toppings for Grilled Corn When it comes to toppings for grilled corn, the possibilities are nearly endless, adding various flavors and textures. For a fresh, green herb touch, thinly sliced parsley, cilantro, or chives work wonders. If you’re looking for a bit of color and a smoky undertone, Paprika or
Marinate Chicken with BBQ Sauce for Juicy Perfection
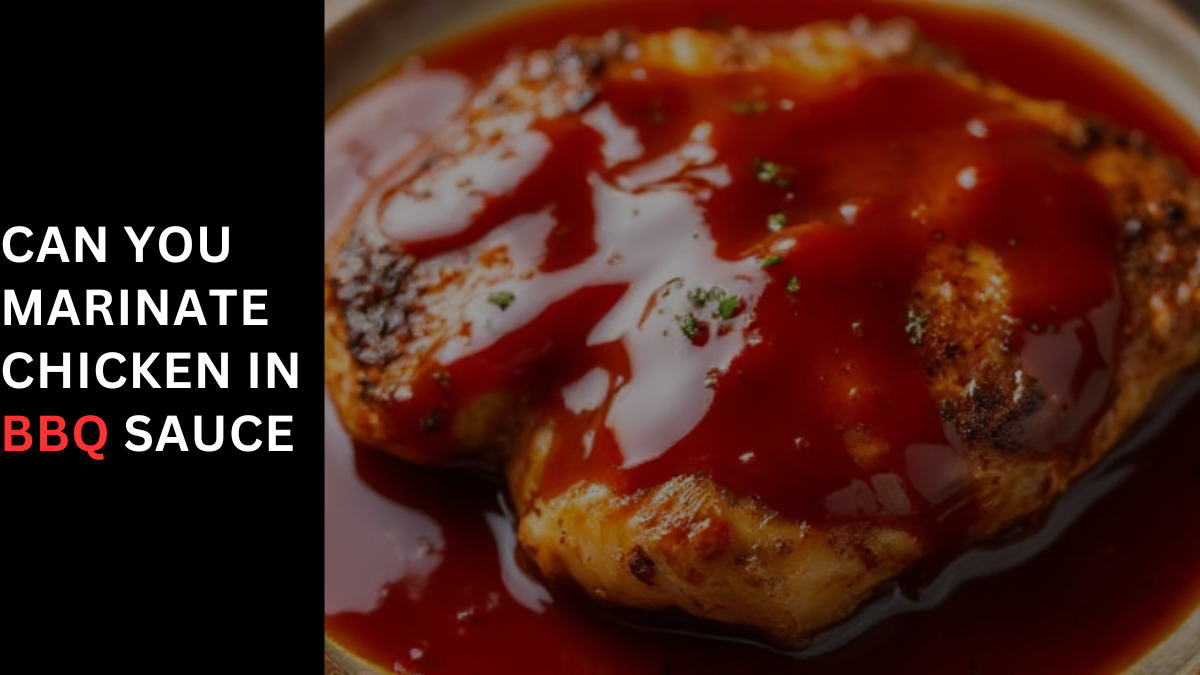
Can You Marinate Chicken in BBQ Sauce? Why You’ll Love This Barbecue Chicken Marinade Recipe When it comes to a BBQ marinade for chicken, the blend of sweet, savory, and tangy flavors creates a symphony in your mouth. Having experimented with various spices, I found that adding smoked paprika not only enhances the depth of flavor but also introduces a subtle smoky essence, reminiscent of traditional barbecue. The beauty of this marinade lies in its versatility – it’s not just for Baked BBQ Chicken. You can use it for basting while grilling or even when smoking meats, offering a delightful twist to your culinary creations. You’re in Control One of the joys of making your marinade is the control you have. When you buy a pre-made marinade from the grocery store, you’re at the mercy of the bottler’s recipe, often laden with corn syrup and other undesirable ingredients. By choosing to make your marinade, you eliminate these concerns. This shift from store-bought to homemade was a game-changer for me, allowing the natural flavors to shine without any unwanted additives. Ridiculously Easy People often assume making marinades is time-consuming, but this isn’t the case. Like a Grilled Shrimp Marinade or a Flank Steak Marinade, this Chicken Marinade is surprisingly simple. Crafting this BBQ chicken marinade is effortless, and you can make it in about 5 minutes. The prep time is minimal, and it primarily uses ingredients found in your pantry. This ease of preparation was a revelation for me, making homemade marinades a regular part of my cooking routine. Flavorful Chicken, All the Way Through When it comes to Marinating chicken in a BBQ marinade, the goal is to achieve a balance of tangy and sweetness that permeates every fiber of the meat. The magic of a good marinade is in its ability to bring barbecue flavor not just to the outside. But deep into the inside, ensuring that every bite is infused with taste. My journey in crafting the perfect marinade has led me to experiment with various ingredients, striving to imbue the chicken with a rich, multi-layered flavor profile. BBQ Chicken Marinade When it’s time for summer grilling, nothing beats BBQ chicken with the best, most flavorful marinade. My recipe has become something special and sought-after, with its tangy and juicy nuances complemented by just the right amount of char. The sugars in the BBQ sauce caramelize beautifully, creating a mouth-watering experience. Serve it with classic BBQ sides like coleslaw, corn salad, and potato salad for a picture-perfect summer cookout that is sure to please everyone. How to Make BBQ Chicken? Creating the perfect BBQ chicken starts with a surprisingly flexible recipe, catering to various types of bone-in chicken. This versatility makes it ideal for parties, whether you’re cooking a whole chicken or cutting it into parts. If you choose the latter route, use an instant-read thermometer for different sizes of pieces, as they will vary in cooking time. A precise, digital read of 165º is your cue. A crucial Tip: make it a habit of cleaning your grill grates before you start. Clean, oiled grates ensure your chicken skin gets crispy and doesn’t stick. The Ingredients For a flavorful BBQ-style marinade, here’s what you’ll need: The Directions To create a delicious BBQ marinated chicken, follow these easy steps: 1- Combine: Stir together all the ingredients in a small bowl. 2- Prep: Pat the chicken dry and place it in a zip-top bag or dish. 3- Marinate: Pour the marinade over the chicken and turn to coat. Allow it to marinate for at least 2 hours, but you can leave it for up to 1 day for more flavor. 4- Cook: Remove the chicken from the marinade and follow the directions for Grilled Chicken Breast, Grilled Chicken Thighs, Baked BBQ Chicken Breast, or Smoked Chicken Breast depending on your preference. To finish and add double flavor, consider using the leftover marinade for a Crockpot BBQ Chicken recipe. This process ensures that every bite of chicken is infused with the mouthwatering flavors of your homemade BBQ sauce. Storage Tips To properly store your unused marinade, refrigerate it in an airtight container or jar for up to a week. If you wish to keep it longer, Freeze it. Transfer the marinade into an airtight, freezer-safe storage container and you can freeze it for up to 3 months. When ready to use, Throw it overnight in the refrigerator before using. Recommended Tools to Make this Recipe Recipe Tips and Tricks When it comes to marinating, remember not to Over-Marinate. Keeping the chicken in the marinade for between 2 hours to 24 hours is ideal. Longer than that and the marinade may start to break down the proteins, affecting the texture of the chicken. It’s always a good idea to Make Extra marinade. You can easily scale up the recipe and keep some on hand in the freezer. Both the ingredients and the marinade itself can be reused. Why not freeze the marinade and chicken together? It’s a great way to spice up dishes like BBQ Chicken Pizza. To Double Up on Flavor, Pair your BBQ chicken marinade with some BBQ sauce for the best BBQ chicken experience. BBQ Marinade Variations The marinade recipe is just a starting point. If you’re fancying a bottle of ready-made sauce, go ahead and make your version. The directions for a classic, Kansas-city style BBQ sauce, or a Carolina BBQ sauce are great routes to explore. For something more wild, you can incorporate ingredients like a can of soda, creating a unique Dr. Pepper BBQ sauce. Does marinating chicken overnight make it taste better? Transitioning to the idea of marinating, specifically the timing aspect, it’s fascinating how a simple process can enhance the flavor of the meat. Whether it’s a whole chicken or chicken wings, the marinating time can vary. However, from my experience, letting the chicken marinate for closer to 24 hours usually yields a more pronounced and developed flavor. The key here is to
Cold Weather, Hot Ribs – Winter’s Best BBQ Rib Combinations
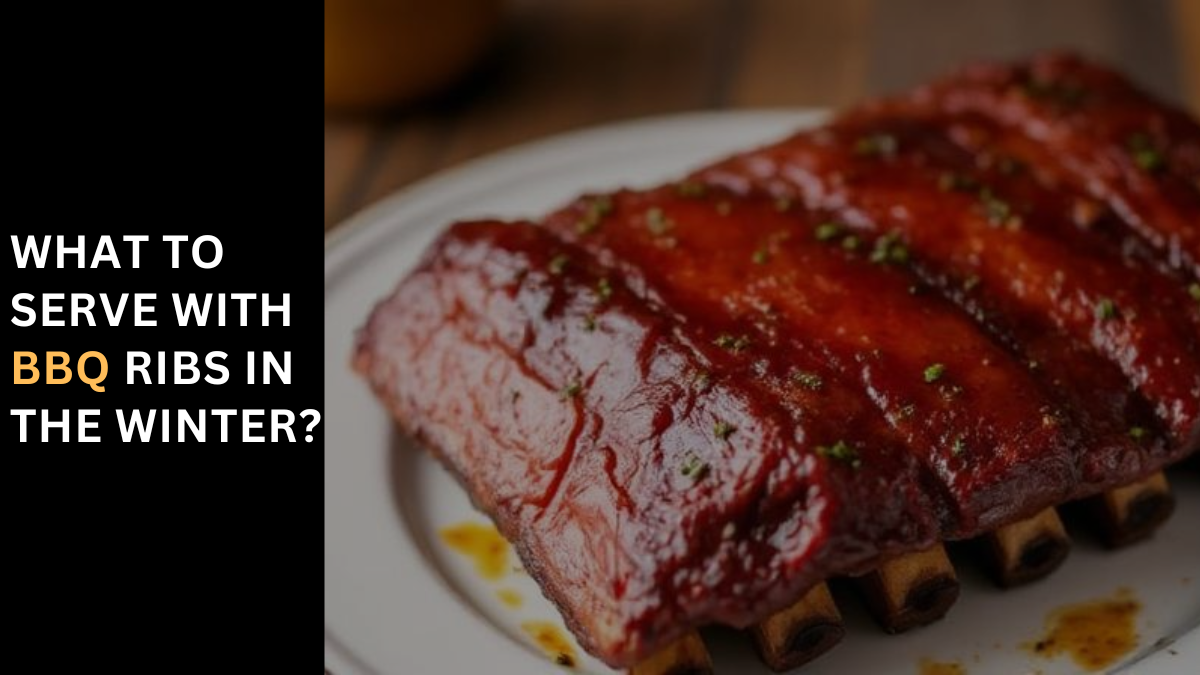
What to Serve With BBQ Ribs in the Winter? Best Side Dishes To Serve With Barbecue Ribs When the weather turns colder, it’s time to host a hearty barbecue event. Serving BBQ ribs, a flavorful meal and Southern favorite, becomes more intriguing in winter. Unlike the summer, where the heat calls for cool, fresh pairings, winter demands hot sides that complement the rich flavor of barbecue ribs with their sweet, tangy, and spicy flavors. The main course of low-and-slow cooked meat requires thoughtful sides to balance the palate. For a twist, think of your side dishes as the icing on the cake. A good dish can enhance the ribs, much like icing complements a cake. Mac and cheese, a classic soul food, offers a creamy texture and quality taste that pairs perfectly with the tangy nature of the ribs. Baked beans and grits, both steamy and hearty, add a comforting warmth, necessary for offsetting the cold. Collard greens offer a fresh dimension, ensuring the meal isn’t overwhelming. As you grill the ribs, let the sides be more than just rules to follow; let them be explorations of flavor that serve to elevate the entire meal. In essence, every side dish you choose to serve with your barbecue ribs this winter should enhance the flavorful meal, making the dining experience as satisfying and memorable as any summer barbecue. Grilled Corn On The Cob Grilled Corn On The Cob is a quintessential cookout item that pairs excellently with ribs on any winter menu. This recipe takes the classic corn on the cob and elevates it, making it less messy by tying back the husks to create a natural handle. For added flavor, the corn can be wrapped in foil with seasonings like Basil Butter With Parmesan or a Smoky Barbecue Rub. This method not only infuses the corn with rich flavors but also makes it a convenient and tasty side dish for any BBQ occasion. Sauteed Cabbage (Easy & Healthy) In the heart of winter, alongside the sizzling BBQ ribs, a dish of Sautéed Green Cabbage stands out as a favorite side. Its popularity isn’t just reserved for picnics; this easy recipe transforms a humble vegetable into a feel-good element of any meal. The process of sautéing brings out the sweet, earthy flavors of the cabbage, making it a dish that’s as satisfying to make as it is to eat. For those who take loving care in their cooking, incorporating such veggies offers a nutritious balance to the indulgence of BBQ ribs. This dish, simple yet flavorful, not only complements the ribs but also adds a much-needed freshness to the winter table, making every eating experience more enjoyable. Baked Black Beans A cozy winter evening with BBQ ribs calls for a side that’s equally heartwarming, and Baked Black Beans fit the bill perfectly. This dish is a party for the taste buds, with a recipe that artfully blends bacon, onions, and a variety of seasonings. The addition of molasses and apple cider vinegar creates a complex, savory-sweet profile, making these beans not just a side but a sweet treat in their own right. The depth of flavors here compliments the smoky ribs, making each bite a delightful experience. This dish has always been a personal favorite at my winter gatherings, bringing warmth and a burst of flavor that elevates the humble black bean to a celebratory level. Smoky-Sweet Baked Beans Moving to Smoky-Sweet Baked Beans, this side dish is a staple with any serving of ribs. The recipe perfectly blends sweet and savory elements, reducing sugar and salt without sacrificing flavor. It’s a classic with an upgrade: added grated sweet potato for a healthy, low-sodium option. These baked beans are a hearty, flavorful complement to the rich taste of BBQ ribs, making them an essential part of your winter BBQ menu. Deviled Egg Pasta Salad Deviled Egg Pasta Salad is a delightful twist combining two favorite apps: traditional macaroni salad and deviled eggs. This salad stands out with its creamy texture and hearty crunch, making it a tasty addition to any winter BBQ. The recipe offers flexibility, allowing you to modify it with your favorite ingredients. It’s a refreshing option that pairs beautifully with the robust flavors of BBQ ribs. Classic Coleslaw When considering what to serve with BBQ ribs, Classic Coleslaw is a must. This side dish works together perfectly with sweet, meaty ribs. The tangy, creamy, and crunchy nature of coleslaw makes it a match made in heaven for any barbecue. Whether it’s alongside the ribs or chopped and used as a topping for sandwiches, slaw is an essential component that aligns beautifully with the flavors of the ribs. Creamy Cucumber Salad Creamy Cucumber Salad is a cooling side dish that beautifully complements barbecue ribs. Start by salting and draining Cucumbers to remove excess water, then mix them with Vidalia onions and a sweet and sour cream sauce. The addition of fresh dill turns it into the ultimate summer salad. It’s best to eat this salad within four hours of preparation, as the cucumbers tend to lose their crunchiness and the dressing can become watery over time. Best Homemade Macaroni And Cheese Best Homemade Macaroni And Cheese takes the classic recipe to new heights. Unlike other iterations that go sans traditional ingredients in favor of more creative add-ins, this version stays simple yet delicious. A key component of any barbecue spread, it combines cheddar for that cheesy goodness and a smooth béchamel sauce. Cubes of cheese are pushed into the pasta mix before baking, creating gooey pockets of cheese that surprise and delight with every bite. This dish perfectly complements the rich flavors of BBQ ribs, making it a winter favorite. Southern-Style Potato Salad Southern-Style Potato Salad is a must-have side dish for any winter BBQ. This dish combines creamy mayonnaise, tangy yellow mustard, crunchy celery, and sweet pickle relish, creating a perfect balance of flavors. The addition of hard-boiled eggs enhances its richness. It’s not just a potluck
Fire Up the Flavor – Simple Guide to BBQ Chicken on Charcoal
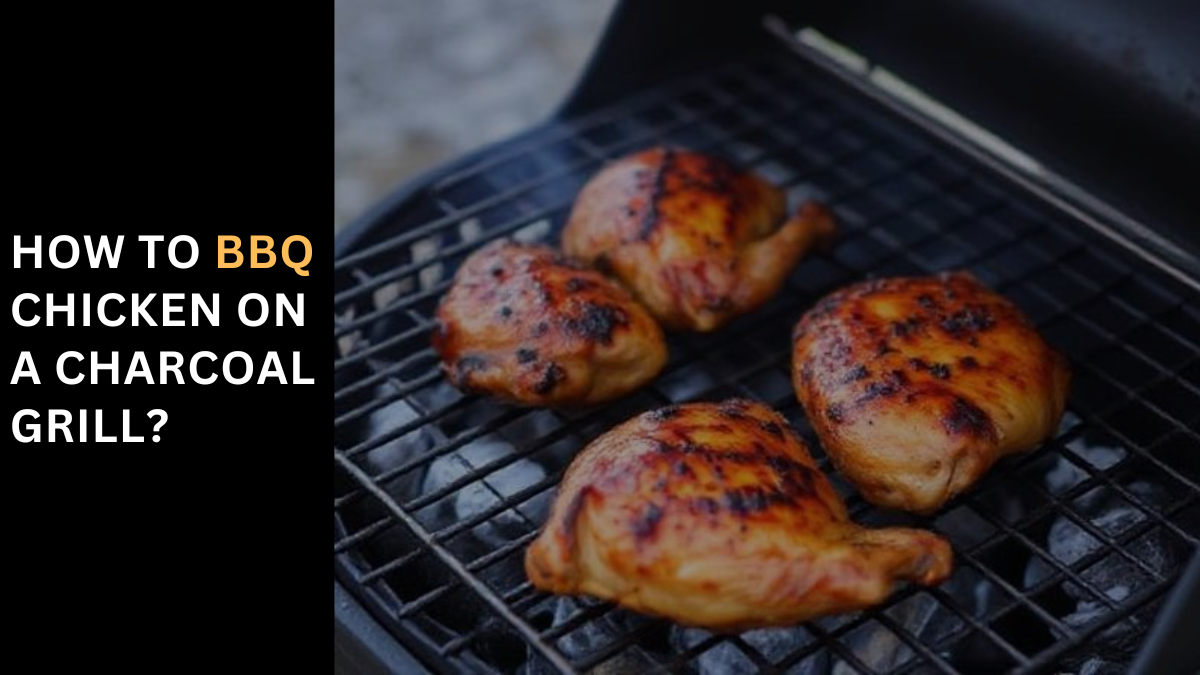
How to BBQ Chicken on a Charcoal Grill? Easy Grilled BBQ Chicken Many BBQ Chicken recipes promise to be easy, yet often the result is just OK. We all have that memory from childhood, biting into a piece of BBQ chicken, only to be disappointed by its bland, unappetizing taste. The common problem with barbeque chicken recipes is their reliance on BBQ sauce alone for flavor, which fails to penetrate the meat, leaving the outside layer bland and unseasoned. The solution is a quick, easy spice rub. When applied to the chicken ahead of grilling, it lends loads of flavor, resulting in a moist and juicy piece of chicken. Fire Up Your Charcoal Grill As someone who’s spent countless afternoons perfecting the art of BBQ chicken on a charcoal grill, I can tell you that mastering this skill is both rewarding and delicious. The basics involve more than just grabbing your barbecue sauce and chicken; it’s an art that combines marinating, seasoning, and causing. Whether you’re grilling wings, thighs, or legs, the secret lies in the balance of timing, temperatures, and cooking techniques. The Essentials of a Great Cookout No cookout is complete without the quintessential barbecue chicken, sitting proudly alongside hotdogs and hamburgers. But, how do you get that perfect, tender, and juicy chicken? It all starts with your charcoal grill. Achieving the right charcoal heat is crucial; it should be hot but not so intense that it dries out the chicken. Remember, we’re not just making any chicken; we’re crafting an experience. How to BBQ a Whole Chicken on a Charcoal Grill? Mastering Marinating and Saucing For a flavor that lingers, start by marinating your chicken. This step is essential for infusing your chicken breast or any part of the whole bird with depth and character. Once on the grill, the saucing begins. Apply your favorite barbecue sauce at the right time to avoid burning, giving your chicken a rich, caramelized layer. Preparing Your Whole Chicken for the Grill Grilling a whole chicken requires a technique called butterflying to ensure the meat has even contact with the grill grates. This method helps the chicken cook more quickly and prevents overcooking. To butterfly, cut along the backbone to remove it, then turn the chicken breast side up. Open it out like a book and lay it flat on a surface. Firmly press down to break the breast bone. Don’t forget to tuck the wing tips under the wings for a more uniform shape. Season your chicken as desired. Grilling to Perfection Now, set up your grill for indirect grilling. Place your seasoned chicken, skin-side down, in the center of the grill over indirect heat. Cover the grill and let the chicken cook for 25 minutes. After this, it’s time to turn and glaze. Brush on some extra sauce. Keep cooking until the chicken reads 180°F on an instant-read thermometer when inserted into the thickest part of the thigh. Once done, remove, give another brush of extra glaze or sauce, and allow it to rest for 10 minutes before slicing and serving. This rest period is crucial for ensuring your chicken is tender and juicy. How to BBQ Chicken Breast on a Charcoal Grill? When grilling chicken breasts on a charcoal grill, the key is to keep a close eye on them, as they can overcook quickly. To add extra flavor and juiciness, I always marinate my chicken before grilling. For cooking, place your boneless chicken breasts directly over medium heat. Cover the grill and let them cook for 15 to 18 minutes, turning them halfway through the grilling time. You know they’re perfectly cooked when an instant-read thermometer inserted into the thickest part of the breast registers 165°F and the juices run clear. This simple yet effective approach ensures a moist and flavorful meal every time. How to BBQ Chicken Thighs on a Charcoal Grill? Grilling chicken thighs on a charcoal grill is a great start for beginners, as this dark meat cooks more slowly and remains juicier than white meat, making it more forgiving on the grill. For boneless chicken thighs, simply season them as desired and place them on the grill rack over medium heat. Cover and cook for 12 to 15 minutes, turning them halfway through the cooking process. If you’re working with bone-in chicken thighs, they’ll need a bit more attention. Grill them directly over the heat for 30 to 35 minutes, turning them every three to four times. Alternatively, for a gentler approach, cook them indirectly for about 50 to 60 minutes. Whichever method you choose, the key is to monitor the cooking time and ensure they’re done to perfection. How to BBQ Chicken Legs on a Charcoal Grill? To cook bone-in drumsticks on a charcoal grill, using indirect heat is key. This method allows the bone to cook more slowly, preventing the meat from drying out, which can happen with direct heat. Set up your charcoal grill for indirect cooking by igniting the charcoal on one side of the grill and placing a drip pan on the other. Place the chicken legs on the grill grates away from the direct heat. Cover the grill and let them cook for about 50 to 60 minutes. They’re done when the meat is no longer pink and registers 180°F on a thermometer. This method ensures each leg is cooked through evenly, offering a perfect balance of flavor and tenderness. How to BBQ Chicken Wings on a Charcoal Grill? Marinating and seasoning chicken wings thoroughly is the first step to a successful BBQ on a charcoal grill. Arrange your wings over medium-heat coals, placing a drip pan underneath. Place the wings on the grill rack and cover the grill. Cook them for 20 to 25 minutes, turning them halfway through the cooking time. When they’re cooked, toss them in your choice of barbecue sauce before serving. Cooking chicken on charcoal is easy, but the trickiest part is knowing how long to cook them. Cooking times can
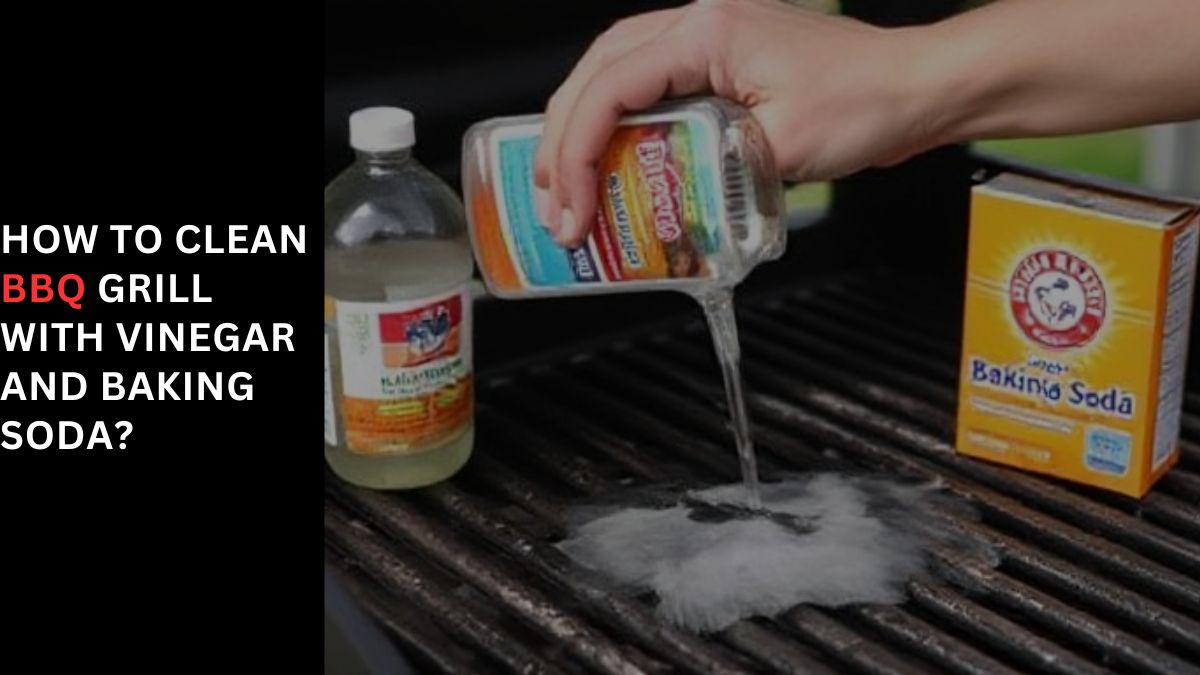
Ultimate Grill Cleaning Hack with Vinegar and Baking Soda
How To Clean BBQ Grill With Vinegar and Baking Soda? Four Ways to Clean Your Grill Grates with Baking Soda In my journey to find the most efficient way to clean my grill grates, I’ve discovered that specialized cleaners often contain harsh chemicals. This realization pushed me towards a more natural method, one that effectively tackles charred grease and grime from the inside of the grill. The solution? A simple mix of baking soda, water, and vinegar. Not only is this method effective, but it also spares me from the harsh fumes of chemical cleaners. Choose Your Best Way to Clean Grill Grates For this technique, you’ll need a nylon-bristled brush or a scourer sponge, and sometimes, in a pinch, a ball of aluminum foil, a paper towel, or a rag might be the only available tools. I’ve used them all on my somewhat grimy stainless steel grill. The process is simple: heat the grill to high to burn off excess food and then let it cool before scrubbing. There are essentially four ways to approach this, depending on whether your grill grates are cast iron or enamel. With minimal effort, a paste of baking soda and vinegar can make your grill look as good as new. Method #1: Clean with Aluminum Foil and Baking Soda For my stainless steel grill grates, I’ve developed a simple, yet effective method. First, mix ARM & HAMMER Baking Soda with water in a small bowl to create a paste of thick liquid consistency. This paste, when applied with a brush or sponge and left for a few minutes, works wonders. Then, tear off a sizable piece of aluminum foil, crumple it into a ball, and scrub along the grate wires. This method is especially useful when working up, down, and across the grates. After scrubbing, simply rinse the grill to reveal a remarkably clean surface. Don’t forget to cover and sit the grill grates after cleaning to ensure they return to their pristine condition. Method #2: Baking Soda and Scour Sponge Grate Cleaning When dealing with porcelain or enamel grill grates, it’s crucial not to scratch the finish. Avoid using a wire brush or aluminum foil. Instead, moisten a damp scourer sponge and sprinkle ARM & HAMMER™ Baking Soda liberally over it. This non-abrasive method has the power to dissolve and abrade charred food bits without damaging coated grill grates. Gently scrub the grill grates with the scouring sponge, ensuring you move up, down, and across for thorough cleaning. After a few minutes, rinse the grill. This method effectively cleans both stainless steel grates and enamel-coated grates, ensuring they’re ready for your next BBQ session. Method #3: Clean Cast Iron Grill Grates Without Removing From the Grill When it comes to cast iron grill grates, known for their durability and ability to heat evenly, maintenance is key to prevent rusting. Interestingly, you don’t need to remove them from the gas grill for cleaning. Here’s how I do it: Mix baking soda, a bit of dish soap, and white vinegar in a small bowl to create a frothy paste with a liquid consistency. Then, generously brush this paste onto the grill grates while they’re still in place on the gas grill. The trick is to turn on the grill and let the paste sit for a few hours or even overnight. This method lets the debris and grime easily come out without much despair. After the paste has done its job, take a damp sponge soaked in warm water to wipe away the now-loosened residue. Then, while the grates are still warm, rub a generous amount of vegetable oil over them. This not only protects the grates but also helps lock in the seasoning. Note: always thoroughly dry the grates after cleaning to prevent moisture build-up. This method ensures your cast iron grates are clean, well seasoned, and ready for your next BBQ without the need to open the grill or reach for difficult spots. It’s a simple yet effective way to maintain your grill grates in top condition. Method #4: No Scrub Baking Soda and Vinegar Grate Cleaning Here’s a no-scrub method I swear by, especially when grilling season begins. For those extremely stubborn, caked-on, grimy grates, this approach is a lifesaver. Start by creating a mixture of baking soda and white vinegar in a large garbage bag – this concoction will start foaming right away. Place your dirty grill grates inside the bag, ensuring it’s large enough to hold them comfortably. Seal the bag tight with a rubber band or string, and place it in a cool, out-of-the-way spot like your garage. Let the grates soak in this solution for several hours or even overnight. The beauty of this method? The grime and grease practically fall away, making any stubborn residue much easier to discard. Once soaking is done, simply remove the grates, rinse them with a hose or in the sink, and wipe off any remaining dirt with a sponge or aluminum foil. No need for labor-intensive scrubbing; this method does the deep clean for you. And just like that, your grates are clean, cool, and ready to return to the grill for your next cookout. How to Clean a BBQ Grill with Vinegar? As a BBQ enthusiast, I’ve found that white table vinegar is a great answer for cleaning a BBQ grill. Here’s how I do it: In a spray bottle, mix equal parts of water and vinegar. This mixture works wonders on grease and grime. Spray it liberally on the grill, ensuring all areas are covered. Let it sit for about ten minutes; this allows the solution to work its magic. For the last scrub, I often use a piece of aluminum foil as a makeshift brush. It’s a commonly used, and great, method. After scrubbing, empty the bottle, refill it with plain water, and give the grill one final rinse. But what about the outside and hard-to-reach places of the grill, especially those prone to accumulating mold?